Detailed Tutorial on Using YFX Layer 2(xDai Network) Through MetaMask
YFX's cross-chain decentralized perpetual contract trading platform recently released its Ethereum Layer 2 solution. Users can transfer assets on ETH network using Layer 2 for 0 gas fee. In the whole process, users only need to pay gas fee for deposit and withdraw of coins on the platform. The gas fee in the xDai layer 2 network is paid by YFX platform through MetaTrade.
So how do users do 0 gas fee transactions on YFX? The following is a complete tutorial using MetaMask wallet.
Login to YFX on MetaMask
Download MetaMask wallet plugin:
Download link:
https://chrome.google.com/webstore/detail/metamask/nkbihfbeogaeaoehlefnkodbefgpgknn?hl=en
After the download is complete, the MetaMask icon is automatically generated in the browser, click to create/log in to the wallet.
Go to YFX's xDai trading page:
https://xdai.yfx.com.
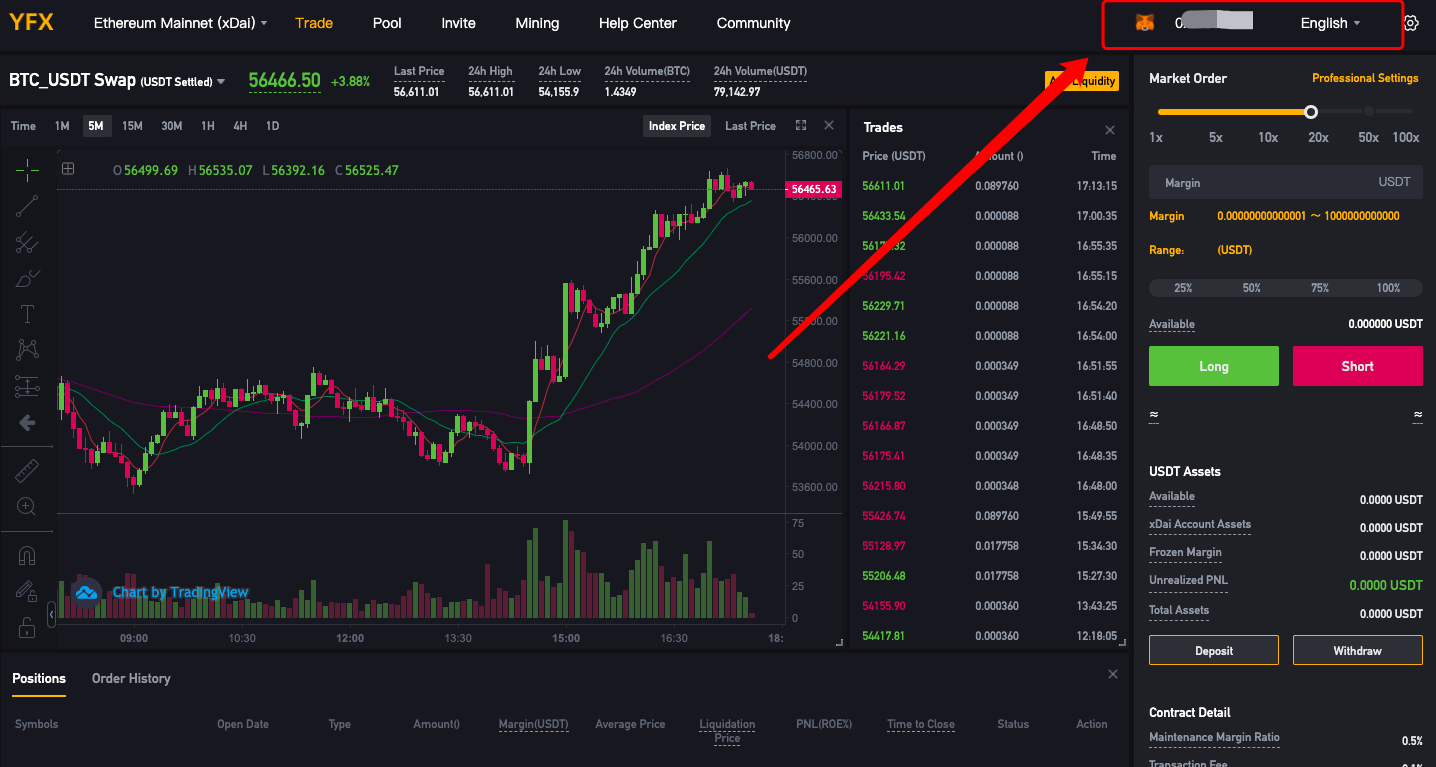
Select "Link Wallet" in the upper left corner.
After the link is successful, users’ current wallet address will be displayed.
Using MetaMask to deposit and withdraw from YFX
Deposit
Enter the xDai network transaction page and select “deposit”.
There are two types of deposits: deposit from the ETH network and deposit from the xDai layer 2 network
1.Deposit from the ETH network: If user’s ETH wallet has token, they can choose [Deposit on Ethereum network], YFX chooses xDai as the layer-2 solution, the assets need to be mapped on the xDai second layer network, so it will take longer (about 3-5 minutes)
Deposit from the xDai layer 2 network (no gas fee is required for this option): If users have assets on the xDai network, they can directly deposit coins from the layer 2 xDai network to YFX.
2.Deposit from the ETH network
Enter the deposit amount and click Deposit on Ethereum network.
If user is depositing on YFX for the first time using xDai, they need to authorize first. Authorization on the ETH network is expected to take 1-3 minutes.
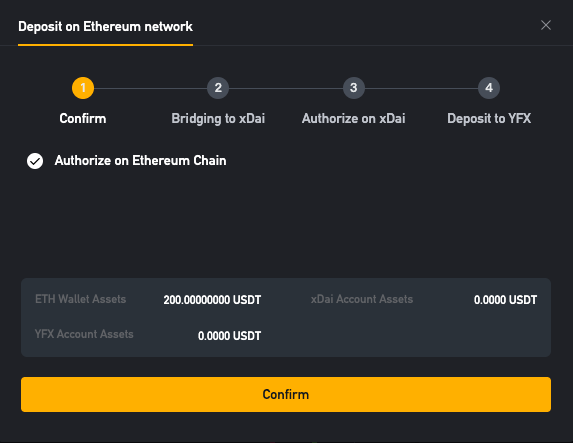
Authorization is in progress (wait 1-3 minutes)
Note: Users can copy their wallet address to the Ethereum browser (
https://etherscan.io/) to check the progress while waiting.
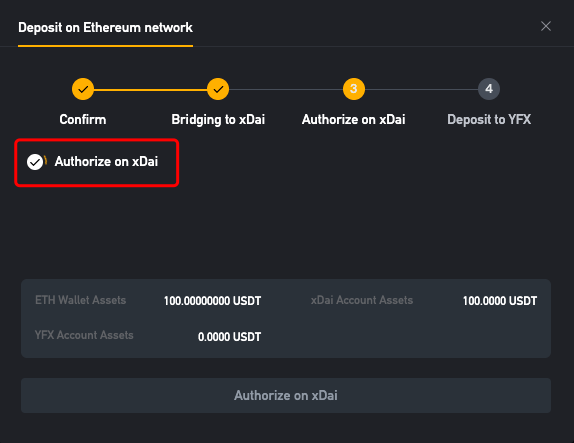
After the authorization is completed, click on bridging, and click confirm. This step requires to pay gas fee on Ethereum network, which is expected to take 1-3 minutes.
During the bridging, the ETH wallet balance will decrease, and the corresponding assets will be bridged to the xDai account balance.
If the cross-chain currency transfer is successful, the assets on the ETH chain will be bridged on the xDai chain.
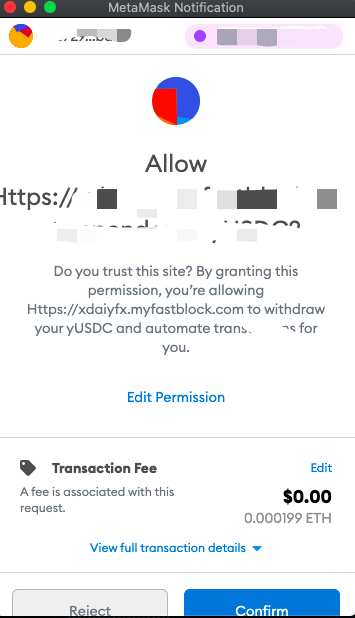
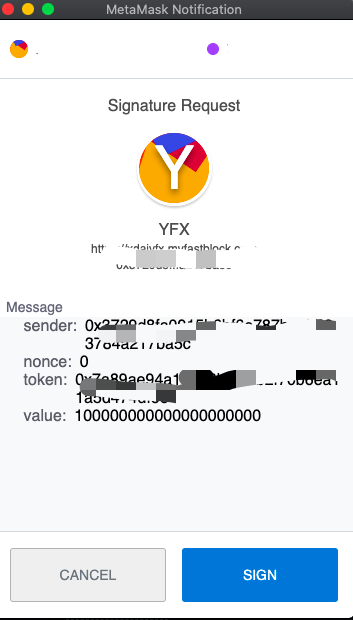
After tokens are deposited to the xDai account, if users have not authorized to use the xDai layer 2 network, they need to authorize on the xDai layer 2 network. Click on the xDai layer 2 network authorization, and a signature confirmation pop-up window will pop up. Click OK.
Note: The red text prompt in the signature pop-up window can be ignored.
Authorization is in progress (wait 1-3 minutes)
Note: If the waiting time is too long, users can copy the deposit address to the xDai browser (https://blockscout.com/poa/xDai) to view the progress.
After the authorization is completed, click Deposit to YFX. Then a signature confirmation pop-up window will pop up, click Confirm.
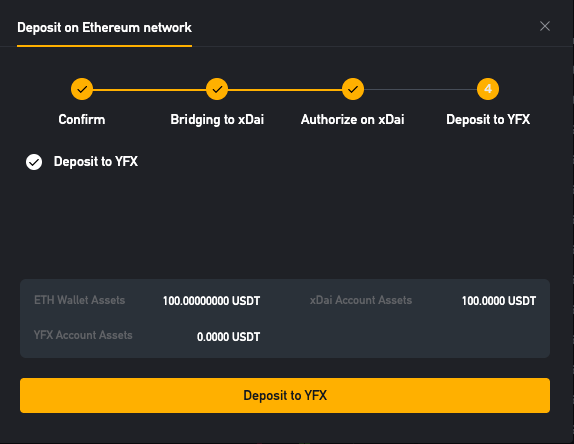
The deposit process will be fast, and assets will arrive in a few seconds.
After the deposit is completed, the xDai account balance will decrease, and the YFX account display the corresponding assets.
Deposit from xDai layer 2 network (No gas fee)
If users have assets on the xDai second-layer network, they can directly choose to [Deposit on xDai layer 2 network]
The USDT from invitation reward will also be directly deposited to the xDai account balance.
Enter the deposit amount, and the amount entered cannot be larger than the xDai account balance
Click deposit to YFX, a signature pop-up window will pop up, click to confirm.
The deposit process will be fast, and assets will arrive in a few seconds.
After deposit is complete, the xDai account balance decreases, and the YFX account balance will display corresponding assets.
Withdrawal
There are two types of withdrawals,
Withdraw coins directly to the ETH network, users need to pay gas fee (0.01-0.05 ETH)
Withdraw coins to the xDai network (no gas fee)
Withdraw coins to ETH
Select withdraw coins to ETH, enter the amount of coins withdrawn, and click withdraw coins to ETH.
After clicking to withdraw to ETH, a prompt box will pop up, click confirm, and a signature pop-up box will pop up after selection, click confirm.
Note: Users withdraw from YFX account to ETH account need to manually confirm the withdrawa. Once confirmed, the withdrawal cannot be canceled. There is a warning to inform users that the gas fee is high, please do not withdraw small amounts.
Assets will first be withdrawn to the xDai cross-chain bridge.
After the transaction is sent successfully, go to the bridging confirmation process. The cross-chain confirmation requires the user to manually go to the xDai bridge and click Execute to complete the cross-chain withdrawal confirmation (click to confirm will automatically go to the xDai bridging page, click Execute) , If users don’t go to the cross-chain bridge for confirmation, the assets will not reach the ETH wallet.
If users close the window during the process, they can find their transaction in the withdrawal record and enter the page again to confirm.
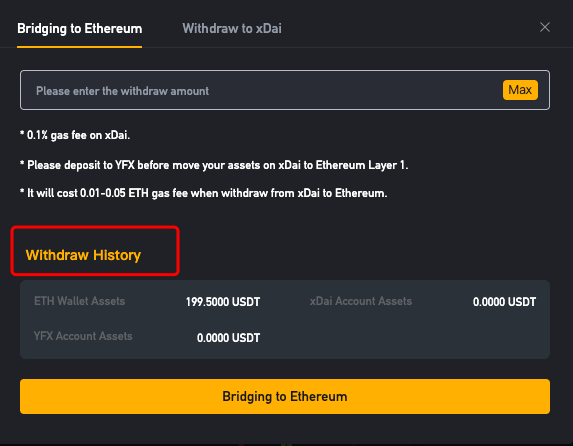
After the withdrawal is completed, the xDai network will charge a 0.1% fee.
Withdraw coins to xDai network
Choose withdraw coins to xDai, enter the amount of withdrawal, and click withdraw coins to xDai. After the operation is completed, a signature pop-up box will pop up, click confirm.
The confirmation process of withdrawing to xDai takes only a few seconds.
Trading on YFX using MetaMask
Note: (users do not need to pay gas fees when trading on Ethereum main net)
Open a position
Enter the margin for opening a position on the trading page, select a leverage, and then choose long/short, and confirm when the signature confirmation box pops up.
After opening a position successfully, users can view their current position on the bottom of the browser.
Margin call
Click the "+" sign behind the margin, a margin call confirmation box will pop up, enter the margin to be added, and click confirm to pop-up signature confirmation box.
Note: Users’ leverage will become less when the margin is added. The minimum leverage of the YFX platform is 1x leverage. After the margin become 1x the leverage, it will not be possible to keep adding margin.
Close a position
Click the "Close Position" button on the order, and a signature confirmation box will pop up. Click Confirm to close the position.
All closed orders can be viewed in the Order History page.
Adding liquidity to YFX liquidity pool using MetaMask
Adding liquidity
Users need to have enough tokens in their YFX account before adding liquidity. After adding balance to YFX account, select “Pool” on the menu.
In the Pool List page, choose the liquidity pool and click “Add”.
After clicking Add, an input box will pop up, enter the amount of tokens wish to be added, and the system will calculate the added share based on the current net value.
After clicking add, a signature confirmation box will pop up, click confirm.
After the addition is successful, users can view it in my position.
Users can also view on Orders page.
Removing liquidity
In the Pool menu, choose the liquidity pool wish to be removed, click “Remove”.
After clicking remove, a remove input box will pop up, enter the share to be removed, and the system will calculate the value of the removed share based on the current net value.
After clicking remove, a signature confirmation box will pop up, click confirm.
After the removal is successful, users can view removed liquidity order in the order.
Note: After the removal is successful, the funds will arrive in the YFX account, and a 0.1% fee will be charged.
Related Articles
YFX.COM & xDai Layer2: Deposit on ETH(xDai) to Get Bonus + Perpetual Contract Trading Competition to share 60,000 YFX Tokens
1. Layer2 ETH(xDai) deposit to get 100YFX Reward: 50,000YFX Event Period: July 1st, 12:00(UTC) - July 22nd, 12:00(UTC) Rule: 1. Deposit ETH via cross-chain or via the xDai layer 2, valid deposit USDT or USDC≥1,000 USD, and complete ≥2 open positions ...